Official Guide · First Use
Shadowrocket Setup Guide
Import an existing subscription → Global Routing → Authorize the connection → Verify access
Follow five steps to establish a basic connection, then adjust settings based on the results. Keep the default settings where possible, changing only what each step requires. This makes it easier to identify the cause if something goes wrong.
- A subscription or details for one server
- Confirm your local network works before connecting
- Change one setting at a time, then verify again
Step 01 · Import connection details
Add Server: Add a Server or Import a Subscription
A subscription link and individual server parameters are two different types of connection details. Identify which one you have, then choose the matching option. You do not need to use both methods.
Use an existing subscription link
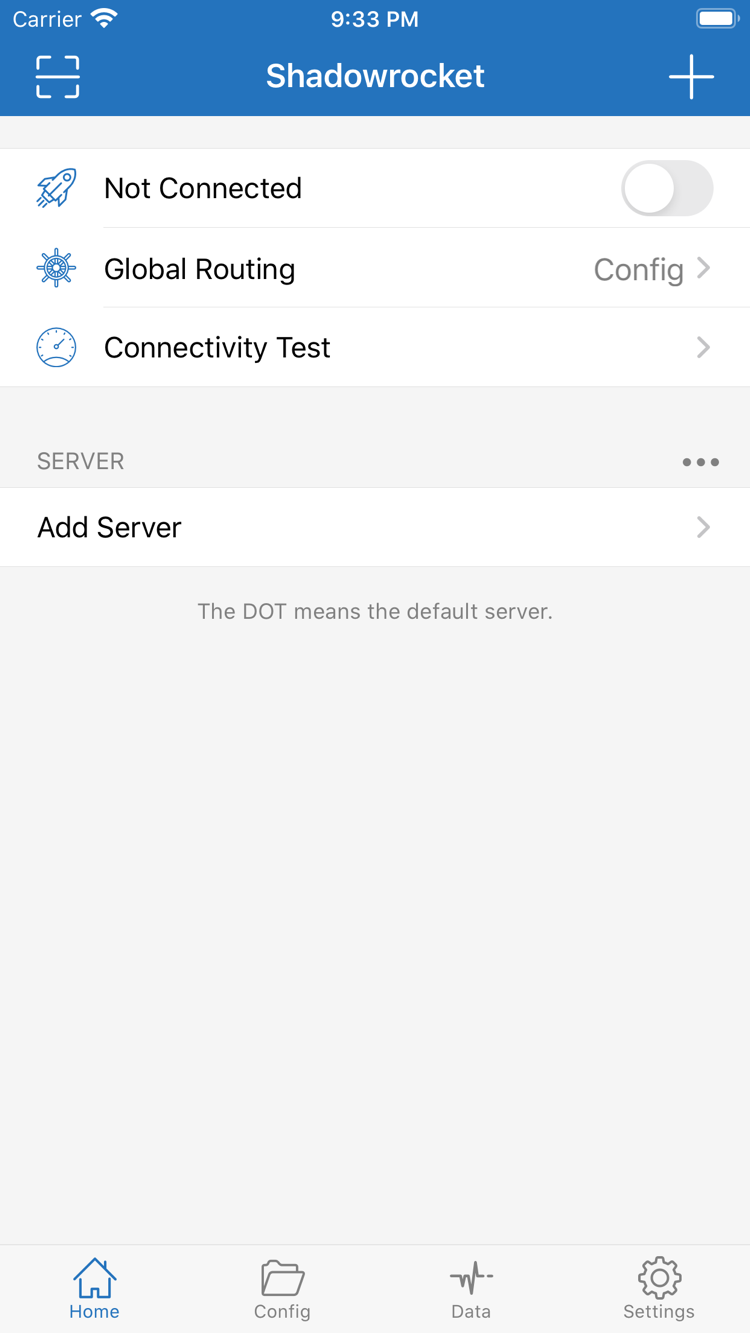
Open Shadowrocket and go to Home, then tap Add Server. Some interfaces also let you open it using the add button at the top. In Add Server, tap Type, select Subscribe, and paste the complete subscription link into the relevant URL field. Get the link from your service provider. Do not use the provider website's login, order, or information page URL as a subscription link.
After pasting, check the beginning and end of the link, especially for spaces, line breaks, quotation marks, or ellipses added during copying. Content after a question mark in the subscription URL may be used for authentication; do not remove it based on appearance alone. Add a recognizable label, save, and wait for the app to retrieve the subscription. Then return to Home, confirm that server entries appear in the list, and select one for this test.
After the first import, do not repeatedly add the same link. If the list has not changed, check whether an import error appears. If entries are present, select a server and continue. Refreshing a subscription retrieves server details; it does not establish a proxy connection or enable rules in a configuration file.
Enter individual server details
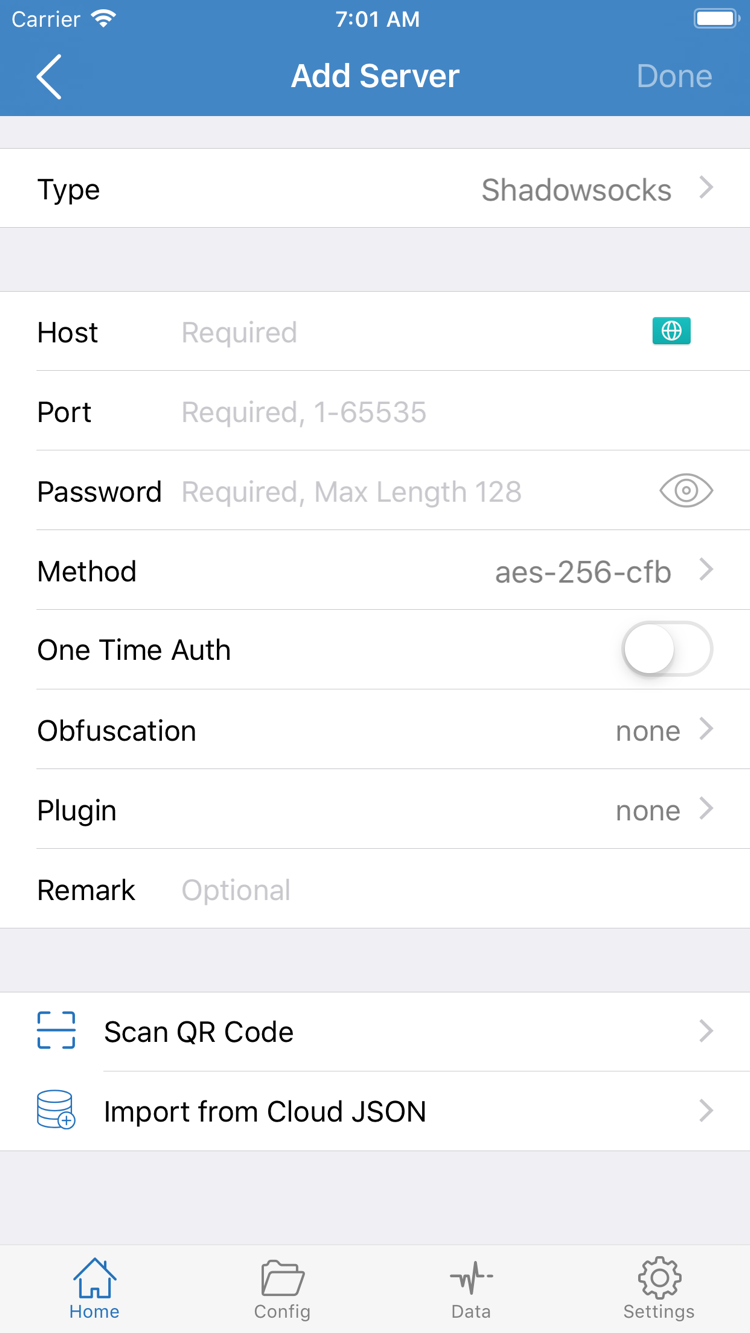
If you have an address, port, authentication details, and protocol parameters, select the protocol specified in your details under Type in Add Server, then fill in each field. Enter the server domain or IP address in Host and the connection port in Port. If the selected protocol requires Password, Method, or other authentication fields, enter the values as provided. Fields vary by protocol; do not apply parameters from one protocol to another.
The Password and Method fields shown in the screenshot are examples for the type displayed on that page. They are not required for every type. If your details also specify TLS, SNI, a transport method, or a path, check those settings too. Do not guess based only on the address and port. If information is missing, ask your service provider for the complete details; this is more effective than repeatedly changing app settings.
If your details are provided as a QR code, use Scan QR Code and grant the required permissions when prompted. Import from Cloud JSON is for the corresponding JSON data and is not a general alternative for regular subscription links. Whichever import method you use, check the detected type, address, and port before saving. When done, return to Home, confirm the target entry appears in the SERVER list, and continue to mode selection.
Step 02 · Choose how requests are handled
Three Global Routing Modes
Before choosing a mode, distinguish between “which server to use” and “which requests use the proxy.” The selected server determines the former; the mode and configuration determine the latter.
Tap Global Routing in Home and check the selected mode. The options are Config / Proxy / Direct. They control how requests are handled; they are not three separate groups of servers. After switching modes, return to Home and check the selected option again so you can confirm the change took effect.
Config: Follow the current rules
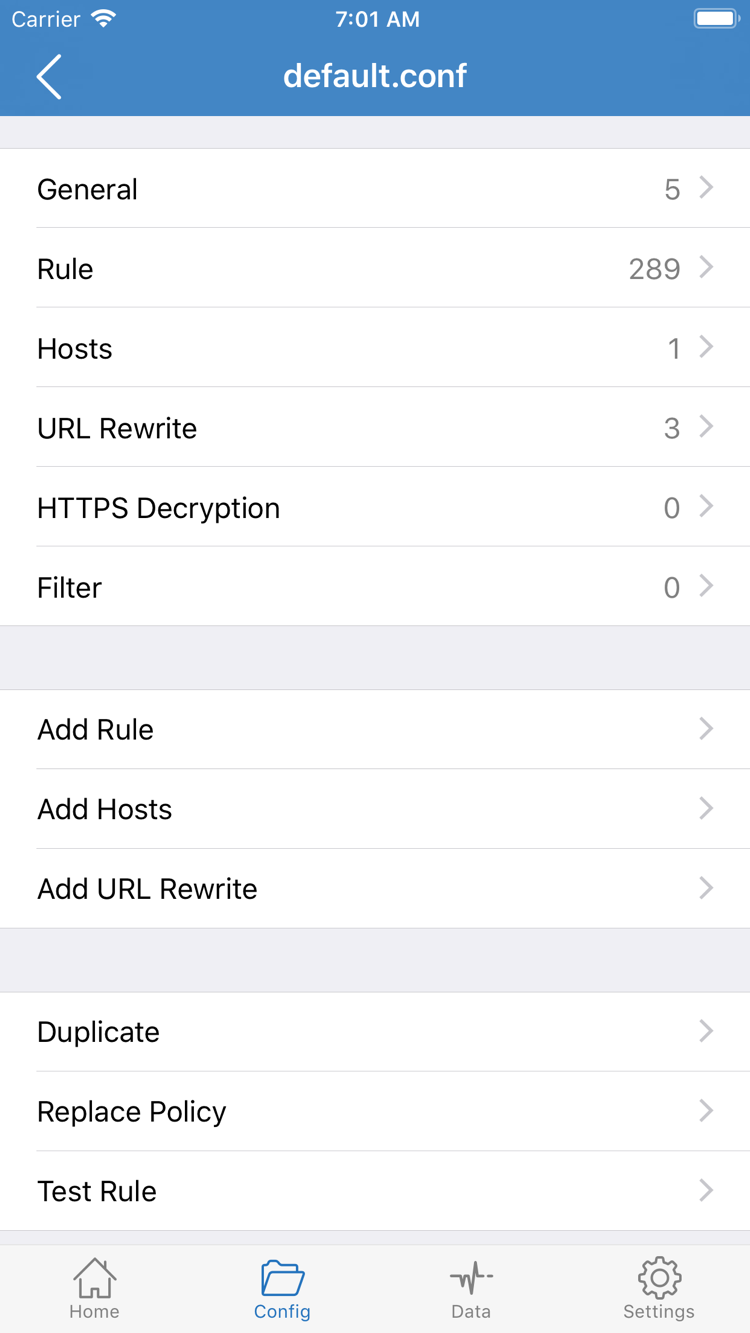
Use Config when you need rule-based routing. The app uses rules in the currently enabled configuration to assign requests to the relevant policies. Before selecting Config, open the Config page and confirm that the configuration you want to use is enabled. Having servers in the list does not mean you have a suitable rule file. Subscriptions and configurations serve different purposes; importing a subscription does not necessarily replace the current rules.
The official screenshot shows a configuration editor with sections such as General, Rule, Hosts, URL Rewrite, and HTTPS Decryption. You do not need to edit every section for a first connection, or enable extra decryption features for a regular connection. Before opening Rule or using Add Rule, understand the rule conditions and order. A broad rule may override more specific rules below it.
For example, DOMAIN-SUFFIX,example.com,PROXY matches a domain suffix and assigns it to the specified policy. This illustrates the syntax; it is not a complete configuration to copy. A request going through DIRECT does not necessarily indicate a connection failure; it may be the result of the current rule. For more on rule types, policy references, and match order, see Proxy Modes and Rules.
Proxy and Direct: Use them for comparison
Proxy can test the proxy connection through the selected server while reducing the impact of rule-based routing on the test. It does not replace checking real access, and it does not mean every type of device traffic can be handled. Direct provides a direct-connection comparison to help determine whether your local network works independently; it is not evidence that the proxy is working.
If you are unsure whether the configuration is correct, select Proxy for a basic connection test, then switch back to Config once the server is confirmed to work. Note the selected mode each time and compare results using the same destination. Keep the mode you want to test selected, then return to Home and turn on the connection switch.
Step 03 · Establish a connection
Home: Connection Switch and First-Time Authorization
Importing details and establishing a connection are separate steps. Select a server first, confirm Global Routing, and then turn on the switch at the top.
Return to Home and select the server you want to use from the SERVER group. If there are several entries, make sure you select a server, rather than relying only on the subscription group name. Then check that Global Routing is still set to the option you chose in the previous step, and tap the connection switch at the top, which should show Not Connected.
When connecting for the first time, the system asks for permission to add a VPN configuration. Confirm that the request is from the Shadowrocket app you are using, then allow it as prompted and complete device passcode or other authentication. This authorization is part of the system process; it does not add a server in the app or require you to paste the subscription again. Return to Shadowrocket when complete and check whether the connection status remains active instead of repeatedly switching it on and off.
If you dismiss the first authorization prompt, return to the app and turn on the switch again, then follow the prompt. If your device is managed by a school or organization, its policies may restrict VPN configurations. Confirm that this type of connection is allowed on the device; do not repeatedly delete unfamiliar device-management items. If another VPN connection is active, disconnect it before testing to avoid confusion when the system switches connections.
If the switch stays on, the app's connection process has started or connected, but that does not prove that a particular website is reachable. An unavailable server, incorrect authentication details, DNS resolution issues, or unexpected configuration policies can all result in “the switch is on, but the page will not load.” Always verify actual access after authorization.
For the first test, keep your current Wi-Fi or cellular network unchanged. Do not change the network, server, and mode at the same time. To test another server, record the original result first, then switch and repeat the same checks. This helps identify what caused a change instead of leaving you with a vague “it sometimes works” conclusion.
Step 04 · Check actual requests
Connectivity Test and Access Verification
Check the connection test, an actual page, and the rule result. Do not draw a conclusion from a single value or the status at the top.
Test first, then visit the same destination
Run Connectivity Test from Home and check whether the selected server responds to the chosen test. The result reflects the response for that test method; it is not a measure of webpage download speed and does not guarantee access to every website or app. If it times out, note the test method and current network first rather than immediately deciding that all servers are unavailable.
Then open a browser and visit a known-working HTTPS page. Check whether it loads fully, rather than relying on a title or cached content. Reload the page or use a new browser tab to reduce interference from old cache. If only one app is affected, compare it with a similar destination in a browser before resetting the entire configuration.
Check the rules under Config
When using Config, open Data to review available request records and check the destination domain, matched rule, and policy. Their location may vary slightly by version; use the current interface as a guide. It is normal for a request expected to go direct to use DIRECT. If a request expected to use the proxy matches a direct policy, check whether the current configuration is enabled and whether an earlier rule is overriding it.
If the same destination works in Proxy but fails in Config, check the configuration and rules first; there is no need to reimport a server that already works. If both modes fail, check the server details, local network, and server status. Keep the server and network the same while comparing, and change only the mode so the results are meaningful.
After one round of testing, restore Config if that is the mode you need for everyday use, then revisit the destination to confirm the result. Record only the network type, server label, mode, and symptom. Do not share a complete subscription link, authentication details, or screenshots that include them. If the result is unexpected, continue with the symptom-based checks below.
Step 05 · Troubleshoot without losing working settings
Common Issues: What to Check First
Identify whether the failure occurs during import, authorization, server connection, or rule handling, then troubleshoot that part.
No servers appear after saving a subscription
Return to the subscription entry and check that Type is set to Subscribe, that the link is complete, and that your current network can reach the subscription service. A regular webpage URL cannot be used to retrieve a subscription, and missing authentication parameters may also result in an incorrect response. Do not post the complete link in public forums. To confirm that it is valid, ask your service provider to check its status and response format.
If it used to update but suddenly fails, retry once on the same network, then compare using another available network. Keeping the original entry helps with comparison; do not repeatedly delete and recreate it before identifying the cause. Even after a successful import, you still need to select a server and connect. Refreshing alone does not complete the remaining steps.
The switch will not turn on or turns off again
First confirm that system authorization is complete, then check whether the device has connection restrictions or is using another VPN. If the system displays a specific message, record its exact text instead of repeatedly tapping the switch. Do not change DNS or rules before completing first-time authorization; those changes usually do not resolve authorization issues.
The switch is on, but the test times out
Check the server type, address, port, and authentication fields in order, then review TLS or transport settings. Testing another existing server on the same network can help distinguish a problem with one server from a local network issue. If the result changes on another network, investigate the network environment. If the same server fails on different networks, ask your service provider to check its status.
Check only relevant items in Settings
Open Settings and review Test Method to understand which method Connectivity Test is using. If a particular test times out but webpages load, do not conclude that the connection is unavailable based on the test alone. Use Diagnostics to review diagnostic information if needed. Before sharing records, hide server addresses, authentication details, and subscription content.
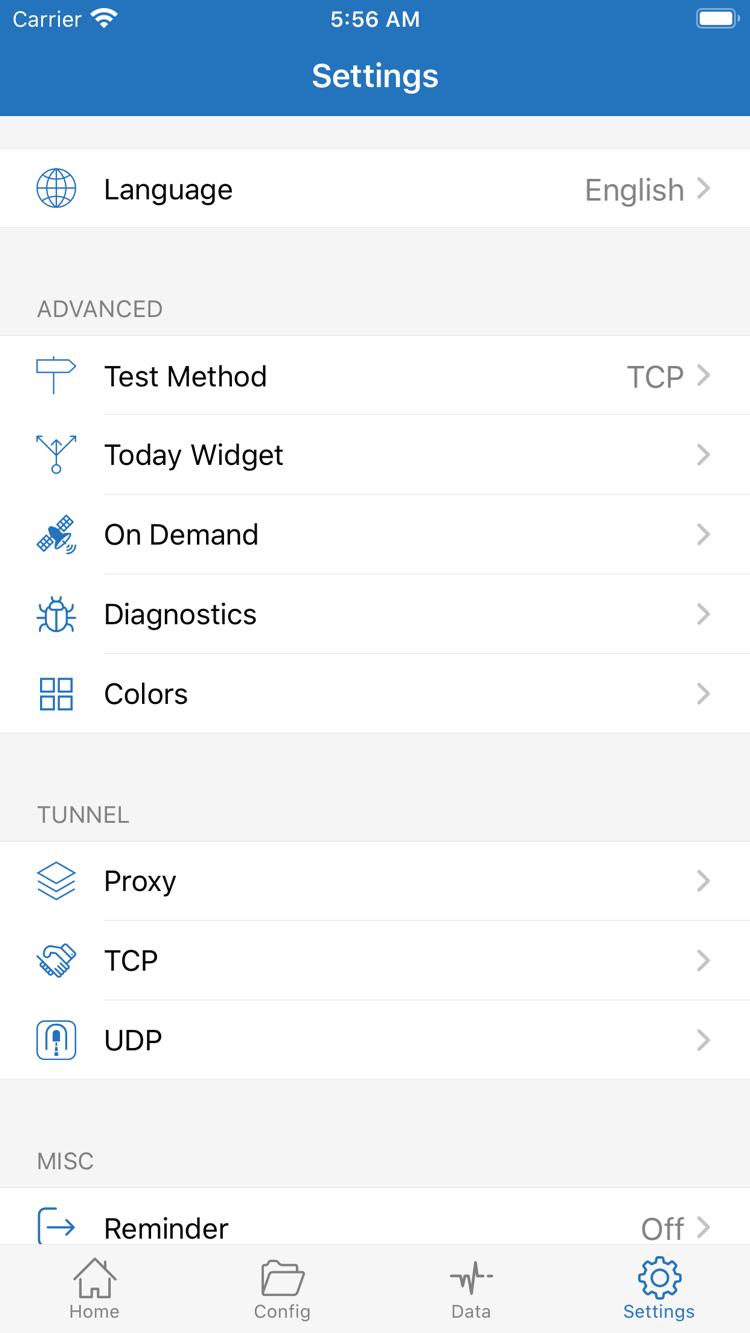
While a first manual connection is still unstable, avoid setting up complex On Demand conditions. If they are enabled, temporarily turn them off while troubleshooting to reduce automatic activation as a source of interference. Once the connection is stable, restore them and test separately. Proxy, TCP, and UDP in the screenshot are settings sections; you do not need to change all of them to troubleshoot. Unnecessary changes introduce more variables.
Connected, but some requests still fail
First compare the results for the same destination in Proxy and Config. If the issue occurs only in Config, check the matched rule and policy. If both modes fail, check DNS, the protocol, and the destination service. Do not delete every server or reinstall the app because one destination fails. For layered troubleshooting of DNS, speed, battery use, and issues after an update, continue to the troubleshooting guide. To review the basic steps, return to adding or importing in this tutorial.
A repeatable first-use process includes saving the details, selecting a server, confirming the mode, authorizing the connection, and testing actual access. Follow the same order when changing a subscription or server later. Make further changes only when the test results point to a specific setting.